10 May 2024
Abstract
Veterinary students studying zoological medicine need to learn how to intubate, force-feed, and draw blood from birds. Unfortunately, no existing anatomical models allow these acts to be performed without risk to a live bird. To circumvent the difficulties of working with live animals, we built a model by acquiring the soft tissue and bone geometry of a rough-legged hawk cadaver using an X-Ray tomography. The bones and soft tissue were then digitally reconstructed and separated from each other, resulting in distinct parts that could be easily assembled after 3D printing. The bones were printed using the powder-bed laser fusion process; tools and accessories were printed using the molten wire deposition process, and soft tissues were cast in silicone. The resulting model was tested by veterinarian specialists in Zoological Medicine and by veterinary students. The project will continue now as a comparative study on the different skill sets acquired between students who trained on the anatomical model before performing the procedures on a live bird as compared to those who learned these procedures the traditional way.
Keywords: Tomography, organic modelling, additive manufacturing, reverse engineering, setting the scene
Background
The practice of drawing blood from the jugular vein and crop feeding is common in the medical care of birds. These techniques are complex on live birds because of the risks of associated complications, namely hemorrhaging caused by laceration of the jugular vein or food regurgitation/aspiration, which can lead to fatal pneumonia. This project aims to develop an anatomical model of a bird’s head to train in these techniques without endangering a live bird. It was launched by Université de Montréal Zoological Medicine Professor Claire Grosset in collaboration with McGill University Bioengineering Professor Natalie Reznikov and ÉTS Mechanical Engineering Professor Vladimir Brailovski. The project is supported by the UdeM Centre de pédagogie universitaire and the ÉTS LAMSI laboratory. It is also part of the forthcoming Centre de simulation et de réalité virtuelle vétérinaire, which will be replicated at the Faculty of Veterinary Medicine’s off-site campus in Rimouski. The overall concept of the centre is to improve teaching while reducing the need for live animals in the veterinary curriculum.
Design Sequence for the Head Model
Figure 1 is a flow chart of the entire process involved in designing and manufacturing the 3D-printed anatomical model for blood sampling, force-feeding, and intubation. Details of the process are given later in the article.
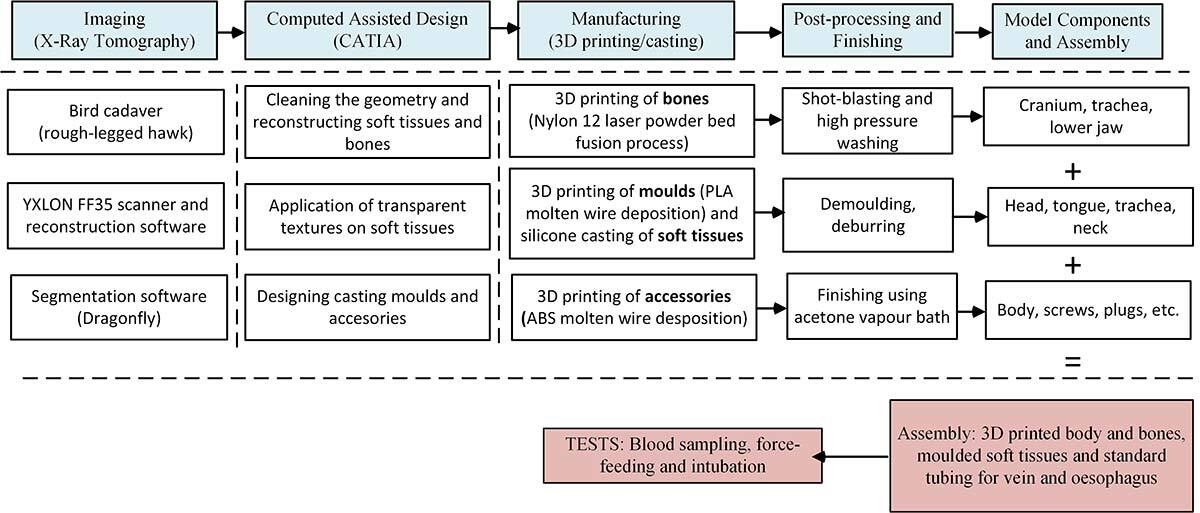
Figure 1. Flow chart of the bird model design and manufacturing process.
Tomography and Tissue Reconstruction
An YXLON FF35 X-ray tomography system is used to acquire a stack of bird tissue images which are back-projected, aligned/registered, and then converted into a three-dimensional model (reconstruction stage) and imported into the Dragonfly software (COMET Technologies Canada) for in-depth analysis. For this study, we used the frozen cadaver of a rough-legged hawk, a bird of prey from the northern regions of Québec, courtesy of McGill Redpath Museum curator Anthony Howell.
Figure 2a shows one such image rendered from the X-ray scan where both bone and soft tissues show differing contrast which is used to separate them as different materials. Since the soft tissues exhibit variable intensity on the reconstruction mode (Figure 2b), we decided to sculpt them from a primitive shape using digitized geometry as a reference. Figure 2c shows the soft tissues after reconstruction, with the head in green, the tongue and trachea in yellow, the neck in red and the chin in blue
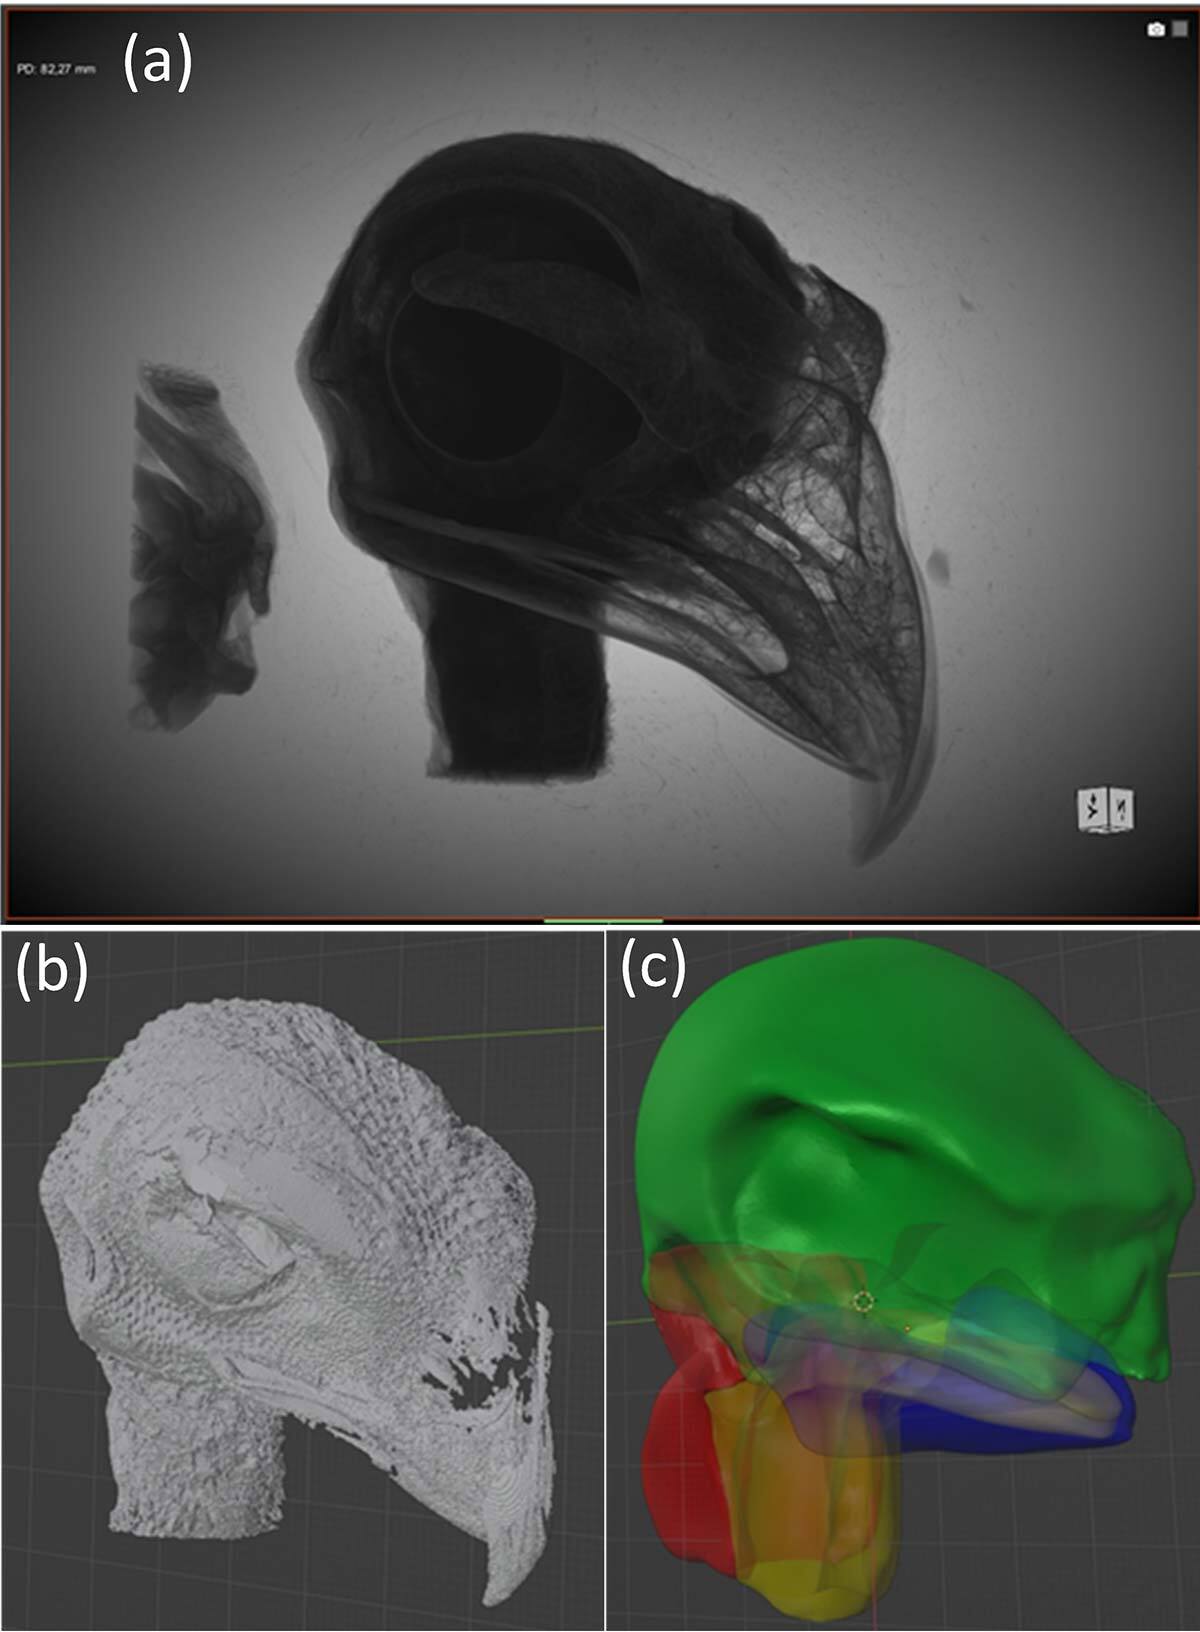
Figure 2. Tomography of the bird head: a) soft tissue, b) as exported by Dragonfly, c) reconstructed.
Figure 3a shows the bony features of the hawk head in both 2D and 3D, Figure 3b shows the tissues after importing into Blender CAD, and Figure 3c shows rendered features after software processing and certain modifications necessary for their manufacturing. In this case, we added a pivot to the jaw, replaced the trachea with a spring, the spine with a chain and the eyes with spheres.
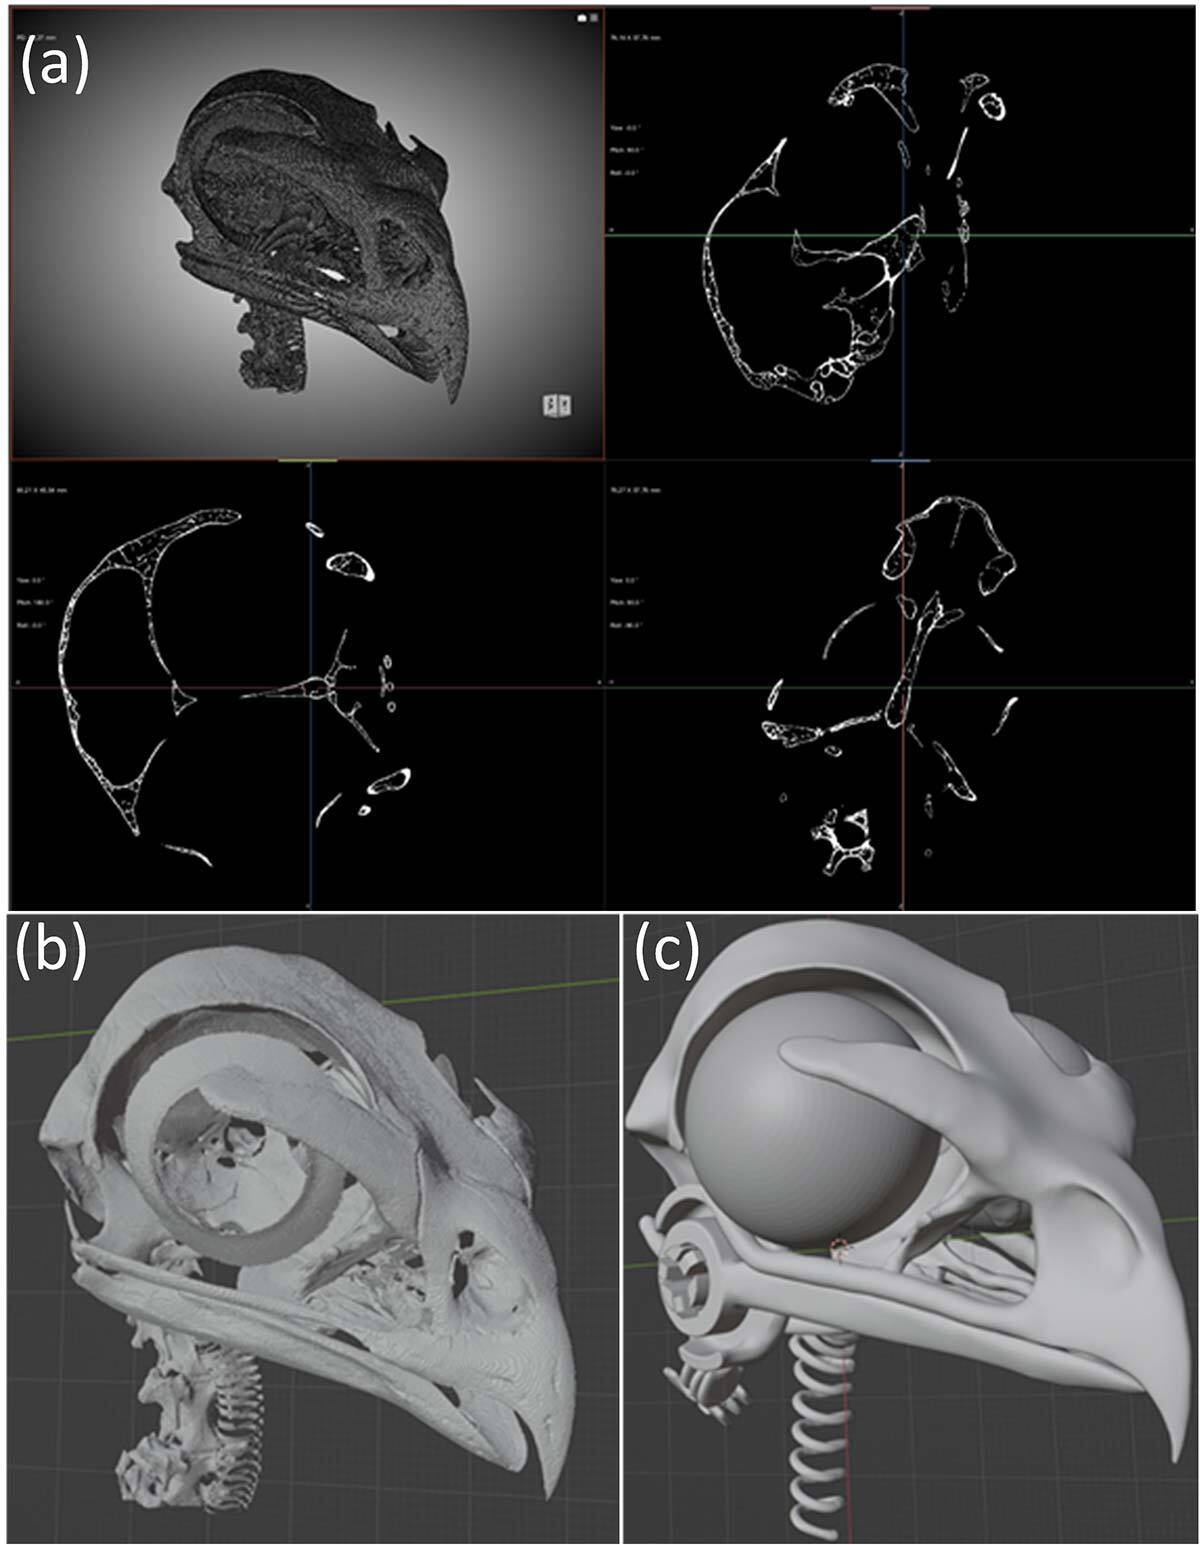
Figure 3. Bone tissue: a) as represented in the tomograph: b) exported by Dragonfly, b) modified, including eyes and articulated jaw.
Designing the Body and Casting Moulds
The model is separated into two parts—body and stylized foot—for printing on a reasonably-sized 3D printer (Fig. 4). This body is designed with a crop, allowing one to palpate the feeding tube, and a dovetail to attach the head. While the design of silicone casting moulds for the head, neck and crop is not illustrated here, this is how it’s done. First, a positive is created from the tissue to be reproduced and the parts to be inserted; then, the mould cavity is obtained by subtracting a solid volume.
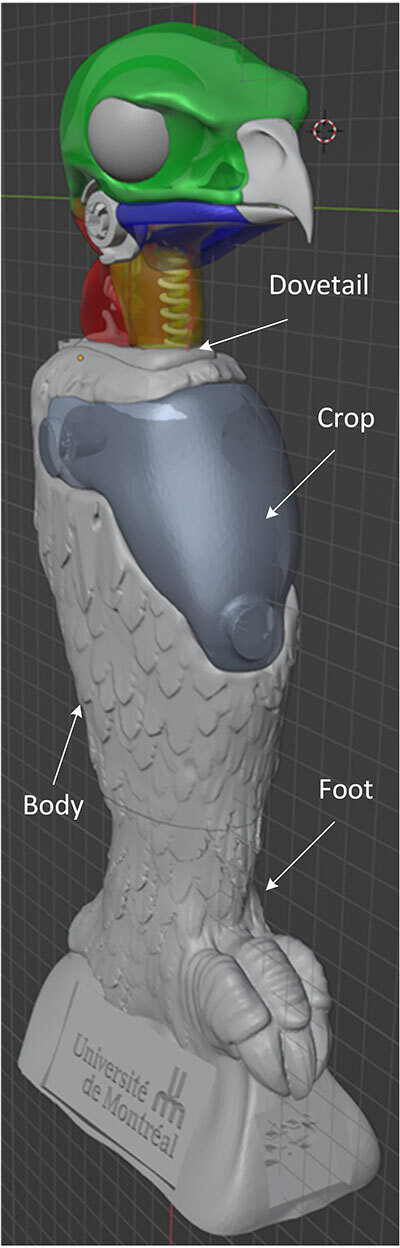
Figure 4. Parts designed for the model.
Manufacturing
After the parts were designed, all that remained was to construct them.
3D Printing
Figure 5 shows all the parts printed by laser powder bed fusion (a) and by molten wire deposition (b).
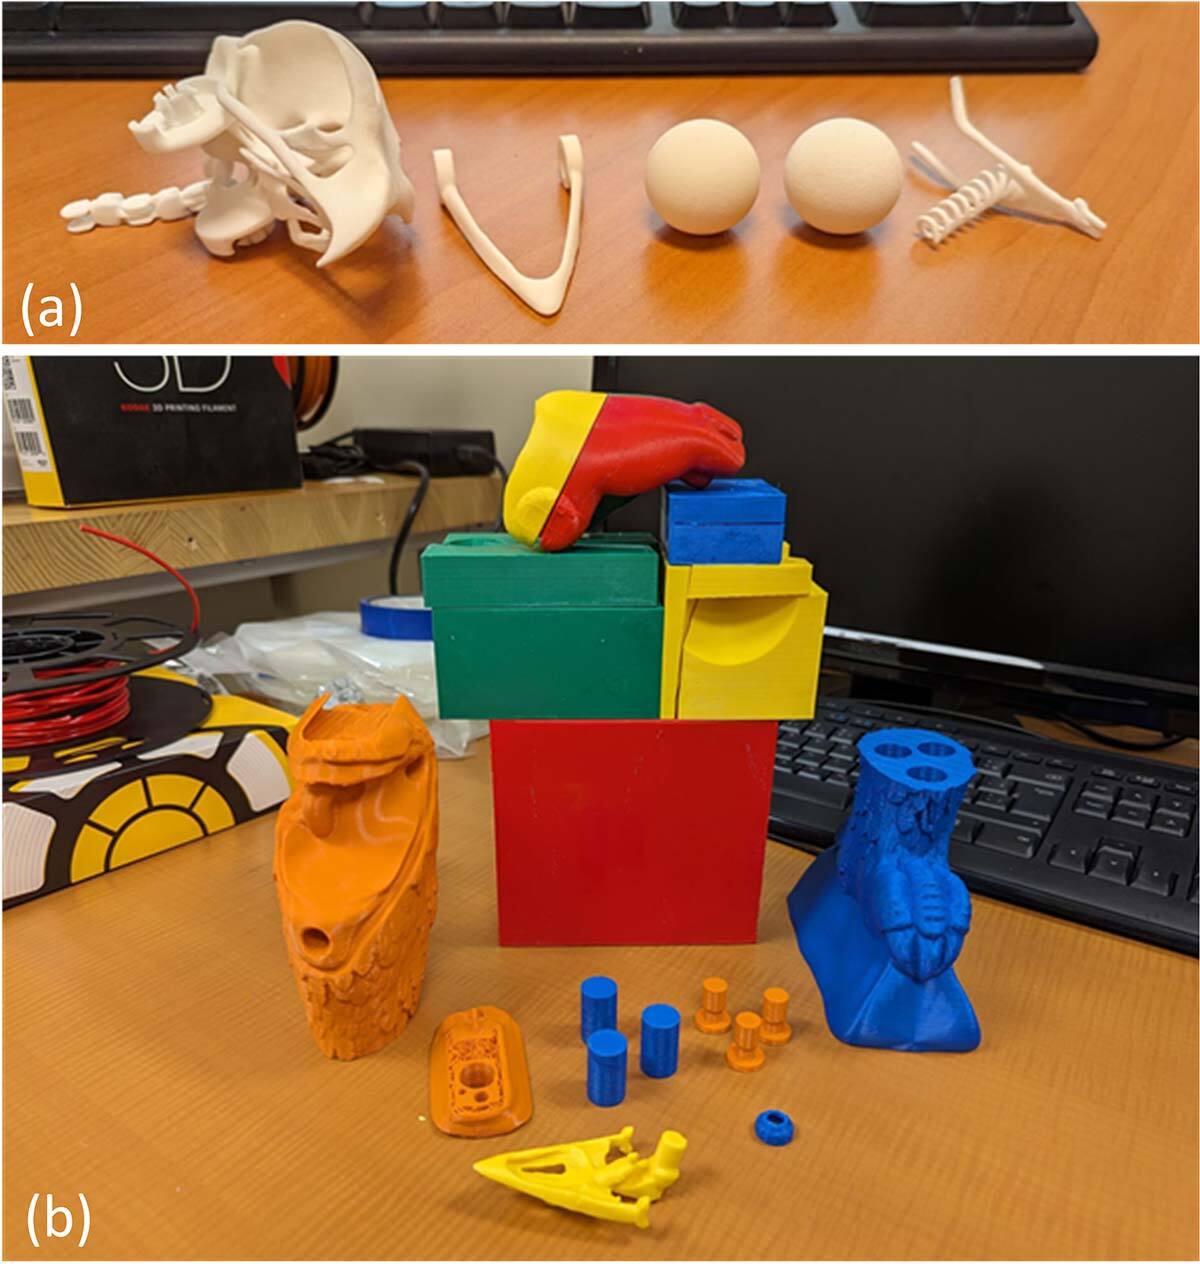
Figure 5. Printed parts: a) by laser fusion on powder bed (polyamide), b) by molten wire deposition (ABS).
Casting the Head and Neck
Figure 6 shows the steps involved in preparing the silicone casting mould and its demoulding. First, the parts are assembled (a), the tubes representing the trachea and esophagus are installed and the mould is closed. Next, the mould is waterproofed and the resin is poured into the mould. After the resin is cured, the tubes are removed, the head is demoulded, the excess silicone is cut away and the inside of the cheeks is separated to make the head easy to open (b). Finally, the jaw is fitted (c).
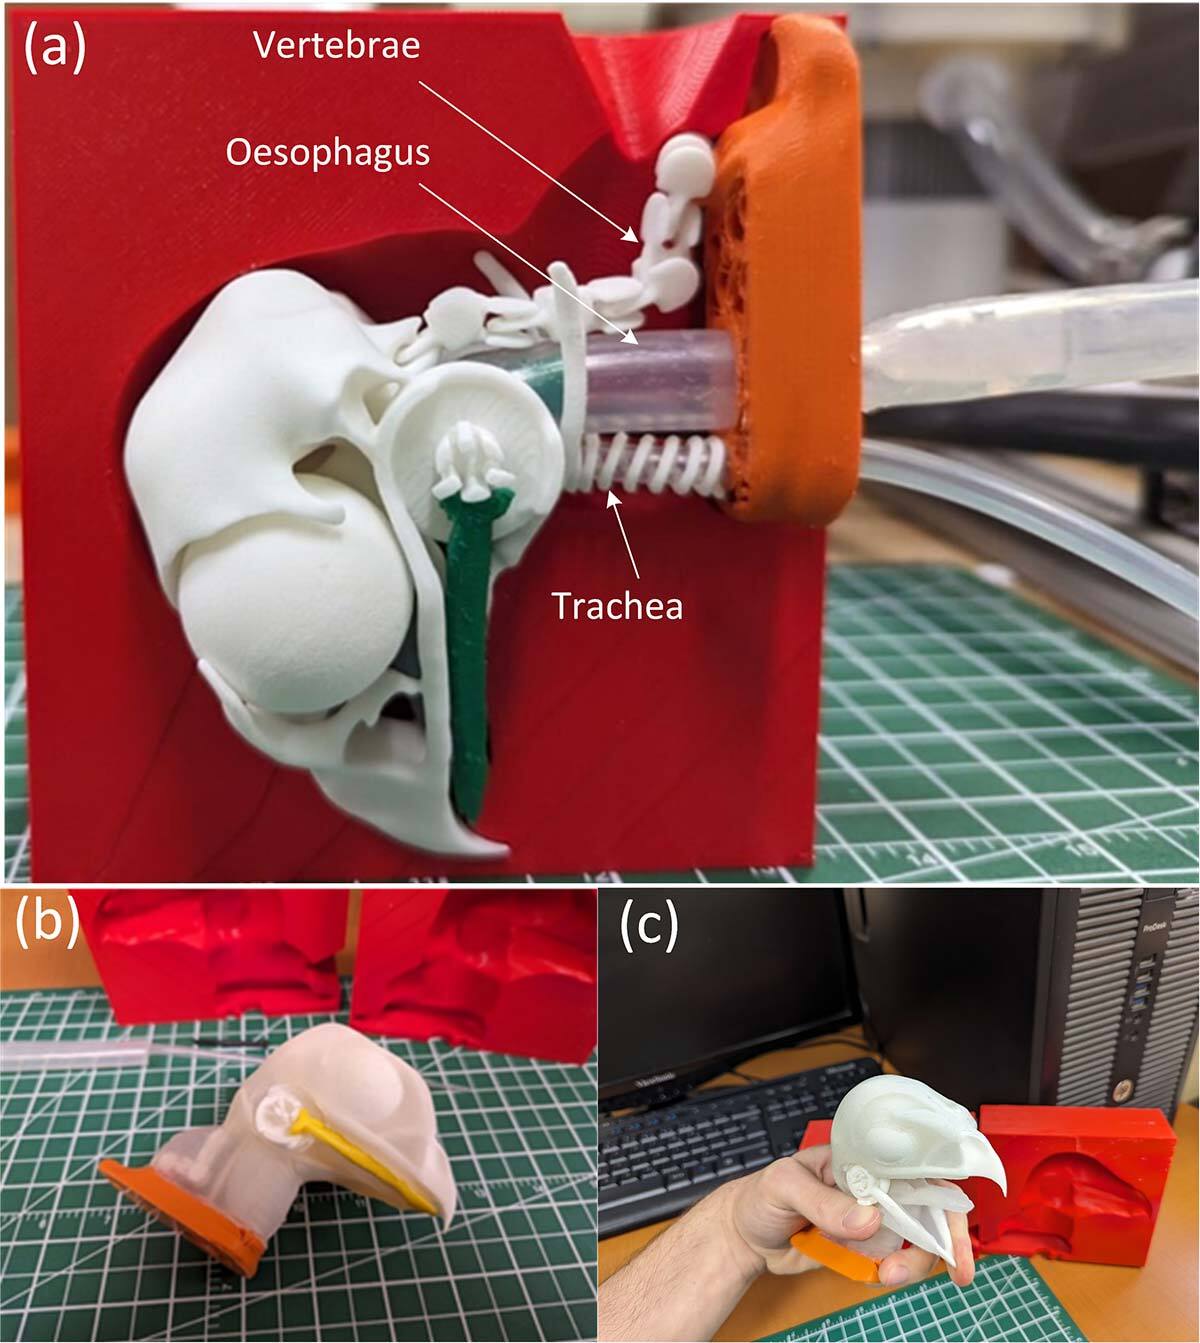
Figure 6. Casting the Head and the Neck: a) mould assembly, b) demoulding, c) jaw fit.
Model Assembly
Figure 7 shows the steps involved in assembling the model. The pins are inserted into the body, and the two body parts (a) are fused together using acetone (b). The crop pins are inserted, the head is slid into place (c) and screwed down (d) to obtain the complete model (e).
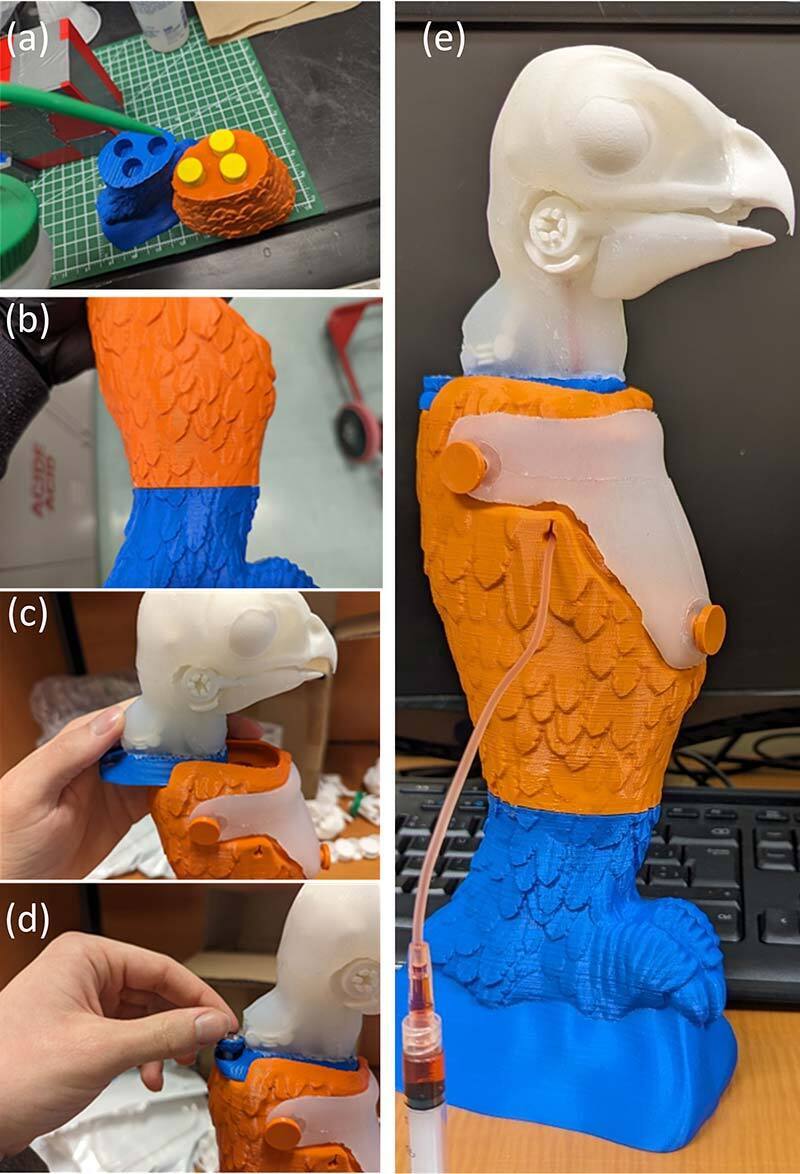
Figure 7. Assembly steps.
Preliminary Tests
When the pilot model was tested live, the response from the veterinary students was very positive despite its imperfections. The elements that needed perfecting were the addition of a palpable crop, the ability to flex the model’s neck dorsally, and the addition of a stopper at the tip of the chinstrap, allowing a larger volume of blood to be drawn (Figure 8). These features were added to the final model. The intubation practice was judged to be very realistic, especially the spontaneous closing of the bird’s beak, which is a source of apprehension for beginners who fear a bite. This feature prepares them for a real-life situation. There are still a few tests to be carried out, but the model seems ready to help them practice their intubation, force-feeding and blood-drawing techniques.
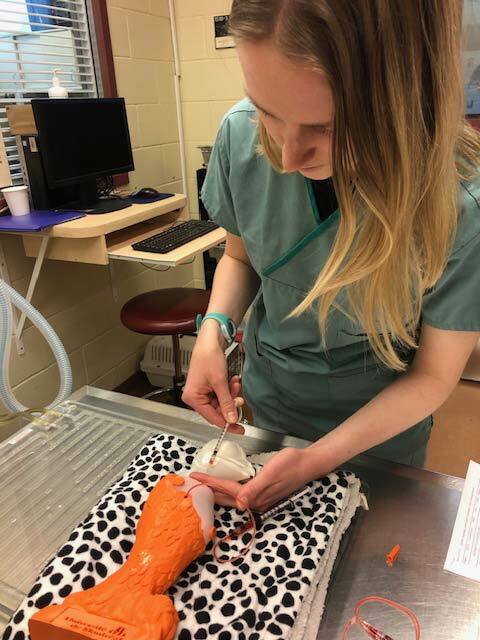
Figure 8 An intern in Zoological Medicine Dr Roose, training for venipuncture.
Conclusion
This multi-university collaborative project produced a unique model in veterinary education. It should help improve the confidence and ease with which veterinary students perform their first intubation, force-feeding, and jugular blood drawing procedures on live birds.
Eventually, several replicas of this model will be sent to the Rimouski Veterinary Simulation and Virtual Reality Centre. Finally, a study of this teaching model will test the difference in skill sets and level of confidence/apprehension between students who have practiced on a model and those who have not had the opportunity.
Bibliography
Comet Technologies Canada Inc. (2021). Dragonfly (version 2021.1 Build 977) [logiciel]. Reference:
https://www.theobjects.com/dragonfly/index.html
Blender Foundation (2024). Blender (version 4.0.1) [logiciel]. Reference:
Onu Heino (2023). Eagle Statue [modèle 3D]. Reference:
https://www.printables.com/fr/model/497410-eagle-statue
Ultimaker (2024). Cura (version 5.6.0) [logiciel]. Reference: